If you’re using a HubSpot’s chatbot and AI-powered answer assistant, you’ve probably run into some of its limits. You can use FlowHunt to power conversations across all HubSpot channels.
FlowHunt will work alongside your current setup, giving you full control over how responses are handled. Decide what your assistant says, where it gets its information, and how it sounds.
On top of providing service, you get to connect various other automation features, such as contact management, lead generation notifications, real-time company research, and more.
Note: These components require a HubSpot integration. Haven’t set it up yet? Start with this quick guide.
What Can You Do with FlowHunt’s HubSpot Chatbot?
FlowHunt gives your HubSpot chatbot more control and flexibility. Instead of just greeting users, your chatbot can now handle real tasks and use real data. Here are a few popular use cases:
- Use Knowledge Base even in free accounts – You don’t need a paid HubSpot subscription to use your knowledge base with FlowHunt. On top of that, you get more control over your chatbot’s knowledge base and access to search third-party sites and databases in real-time.
- Contact management – Update or create new contacts in real time based on information shared in conversations (don’t forget to ask for data consent).
- Data enrichment – Enrich your contacts by performing real-time research based on information shared in chat (don’t forget to ask for data consent).
- Human Handoff – Route support tickets to human agents when needed, with seamless ticket handoff.
- Lead gathering and qualification – Set up lead gathering and qualification sequences from asking the right questions and enriching contact lists, to getting custom reports and email notifications.
- Personalization – Deliver personalized product recommendations or onboarding directly in chat.
- Access to 20+ AI models – FlowHunt supports more than 20 AI Models from various providers, including smaller open-source models. Instead of getting locked in with a single in-house model, you can easily swap and test LLMs to find which one fits you the best.
Overview of HubSpot Messaging components
You’ll notice there are six components in the HubSpot category. We’ll focus on the Create New Message in HubSpot and HubSpot Message Received components, since they are crucial for the chatbot to work. These two components serve as the start and end points of HubSpot responses, and control where and how the chatbot answers.
HubSpot Message Received
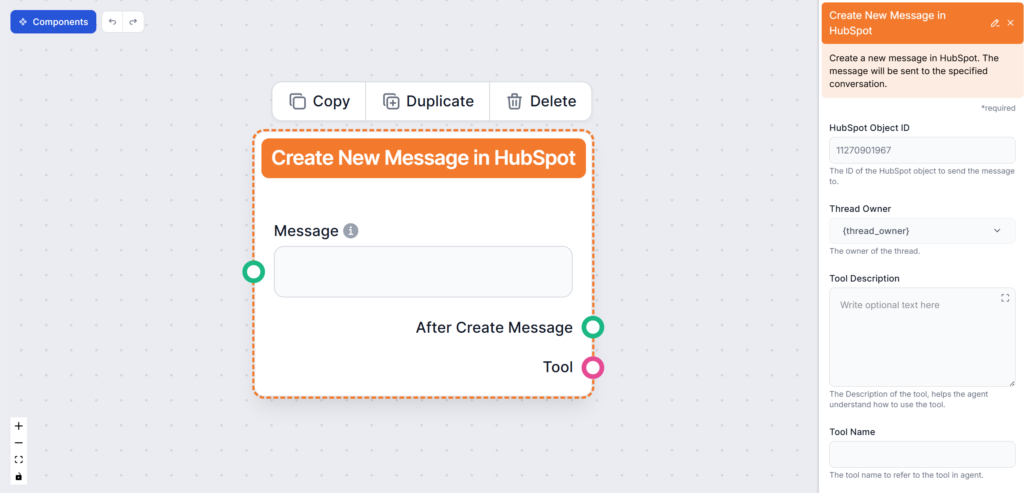
This component represents the start of the conversation with FlowHunt. You can think of it as a trigger component. If you’re familiar with creating Flows, you can also think of it as a replacement for the Chat Input component, as these serve a very similar purpose.
Component Handles
This component includes only one output handle, representing the message sent by the chatbot user. Since this component is always at the start of a Flow or a subflow, there is no input handle.
- Non-Agent Message – The message sent by the customer, not the agent.
Component Settings
- Thread Owner – This optional setting allows you to have FlowHunt only answer for a specific user. If left as default, FlowHunt will answer all threads. We recommend setting up a separate user for FlowHunt and auto-assigning incoming chats to that user.
Create New Message in HubSpot
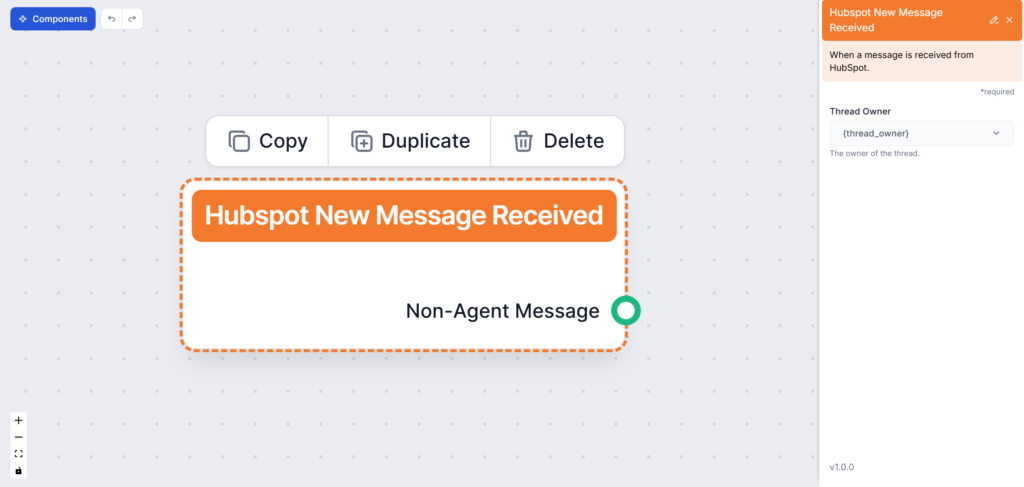
This component represents AI’s messages back to the customer. It lets you control where and how FlowHunt sends answers.
You can think of this component as a replacement for the Chat Output. You’ll usually find this component at the very end of a Flow, but the final output can optionally be sent for further processing.
Component Handles
Both output handles of his component are optional and this component works perfectly well at the end of an entire Flow. The only required connection is the message input.
- Input – Message: Required. Specifies the messages sent back to the user. These messages typically come from an AI Agent or Generator.
- Output – After Create Message: Optional. Useful for chaining post-response actions.
- Output – Tool: Lets you reuse the component as a tool in more advanced flows (e.g., to update contacts)
Component Settings
- Object ID – Optional setting for specifying a singular thread FlowHunt should answer in.
- Thread Owner – This optional setting allows you to have FlowHunt only answer for a specific user. If left as default, FlowHunt will answer all threads. We recommend setting up a new user for FlowHunt and auto-assigning incoming chats to that user.
- Tool Description – Give additional information to help the agent understand how to use the tool.
- Tool Name – Add a name the agent should use to refer to this component in verbose output. This name is used for your convenience.
- Verbose – Pick whether the agent should show its thought process in the FlowHunt chat interface. This is especially useful for debugging.
Using the HubSpot Chatbot
Let’s create a simple customer service chatbot for HubSpot. There are various ways you can make this chatbot more powerful and better suited to your needs. Given the vast amount of possibilities, we’ll only cover the classic chatbot use case, so you can learn how to use the components and see the chatbot in action.
Let’s first look at the simplest bare-bones version of a HubSpot Flow, so you can better understand how the HubSpot messaging components work. The simplest Flow only requires three components:
- HubSpot Message Received
- AI Agent
- Create New Message in HubSpot
- Connect the HubSpot New Message Received to the AI Agent using the Non-Agent Message handle.
- Connect Agent’s message output to the input of the Create New Message in HubSpot component.
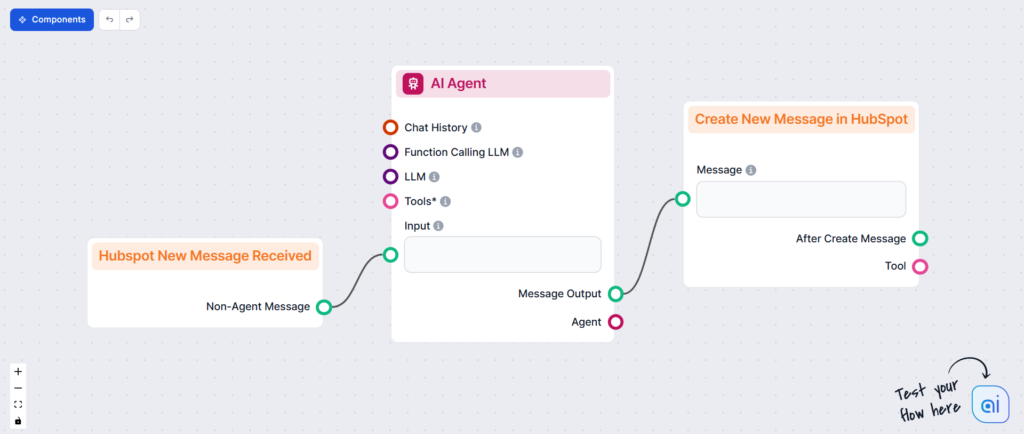
- If you only want FlowHunt to answer specific threads, you can set the thread owner or even thread ID.
- Don’t forget to let the Agent know what its task is. If you need help setting up the AI Agent, refer to this guide.
Establishing a connection is that simple. However, this Flow is far from perfect. Let’s add the features any good customer service chatbot should have.
Customer Service HubSpot Flow With Contact Management
Here’s an example customer service Flow that uses the Claude Sonnet 3,5 as LLM instead of OpenAI’s models. For tools, it has access to verified information from your internal knowledge base via the Document Retriever component, but it can also search Google in real-time:
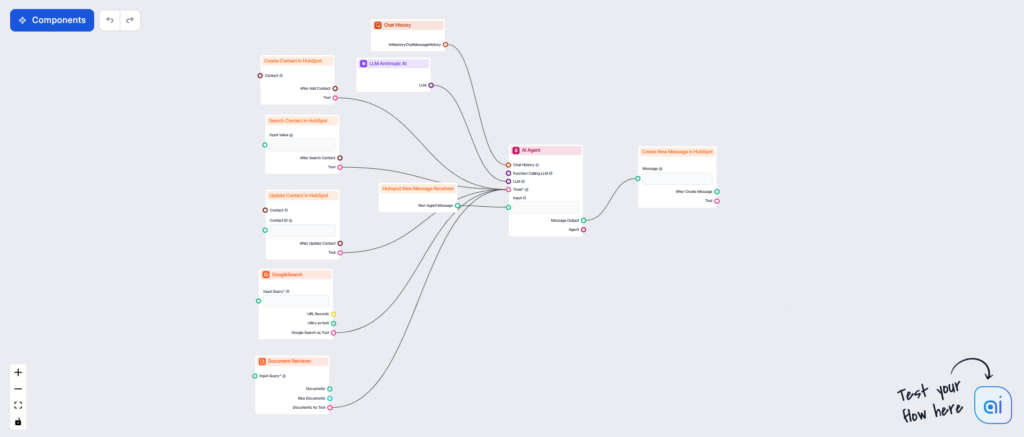
Head to the Flow Library to get this and other HubSpot Flows as ready-to-go templates.
You’ll also notice the HubSpot contact management components:
- Search Contact in HubSpot – Uses information shared in chat to search for the exact contact. It then passes this information to other components, creating dozens of possible use cases.
- Create New Contact in HubSpot – Automatically captures information and creates contacts.
- Update Contact in HubSpot – Edits existing contacts to add or change information.
Now you’ve built a full customer service chatbot powered by an autonomous AI agent, who uses your knowledge sources to answer customer queries. It can also use the provided information to search for and edit or create customer data.
But there’s still one crucial customer service feature missing – the human fallback options. If you’ve used other customer service Flows, you might’ve noticed most of them include human handoff of notification email components. In HubSpot, this is done a bit differently.
How To Perform Ticket Transfer in HubSpot
To make sure human agents can easily take over from the chatbot when needed, you’ll want to create a dedicated FlowHunt user inside HubSpot and auto-assign messages. This setup keeps the handoff smooth and ensures your agents are always looped in at the right moment.
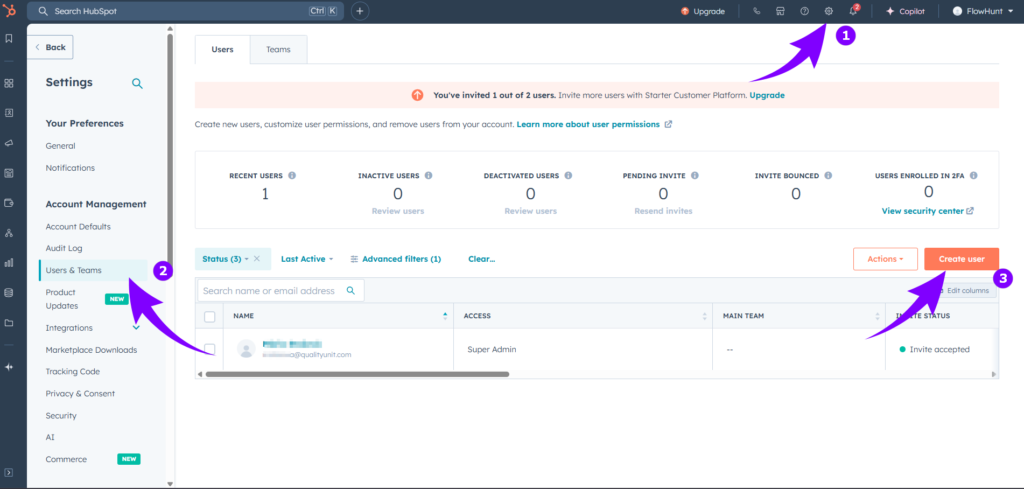
- Create a new user in HubSpot by going to Settings -> Users & Teams and click Create User. Send the invite to an email you want to be associated with your chatbot:
- As soon as you send the invite, you’ll see a new user with “Invitation pending” status. Go to your email and accept the invitation.
- Create a new user with the sales permission template. As suggested by the template, the user will have access to to contacts, sales, service, marketing, reporting, and more.
- Now you need to ensure that the chatbot is assigned the tickets automatically. This process will differ based on the channel. For more information, see the HubSpot ticket routing guide.
- For the Chat Widget use cases, go to Automation -> Chatflow. Hover over the chatflow and click Edit.
- In the Build tab of the settings, click “Automatically assign conversations” and set Assign to the chatbot user you’ve created:

Note: Auto-assigning threads is only available for paid HubSpot accounts. If there is a setting specifying behavior for when the user is unavailable, set it to assign anyway.
- Now go to your Flow and set the Thread Owner in both HubSpot New Message Received and Create New HubSpot Message components as the new user you’ve just created:
Now your Chatbot is fully set up for human transfer, allowing you to take over critical conversations whenever needed. All you have to do is switch the assigned ticket owner from the chatbot user to a human agent:

To switch back to the chatbot, simply re-assign the ticket again.
Testing The HubSpot Customer Service Chatbot
It’s time to test out your HubSpot Customer Service Chatbot. With HubSpot, FlowHunt is just the backend powering your HubSpot chatbot, and all the important actions happen right in your HubSpot dashboard.
Remember that FlowHunt can answer threads from any source:
- Email inbox
- Facebook messenger
- HubSpot chat widget
For this example, we’ll use the chat widget, as it’s the easiest to test and ensure your chatbot connection works correctly.
- We assume you’ve already created a chat widget. If not, go ahead and create it.
- For testing purposes, you can use any user, but we recommend you create a separate user just for the FlowHunt chatbot.
- If you own a paid HubSpot account, feel free to set the chat widget to auto-assign incoming tickets to the chatbot User.
- We’ll use the Flow we’ve covered in previous sections. You can easily find it in the Flow Library or build it yourself. Besides answering customer queries using your knowledge base, this Flow also uses customer responses to search your contact list and update or create new contacts automatically:

Let’s go over to the Chatflow Preview mode. You can access it by going to automatons -> Chatflows, clicking Edit on the chatflow, and then clicking the Preview button in the top right corner:
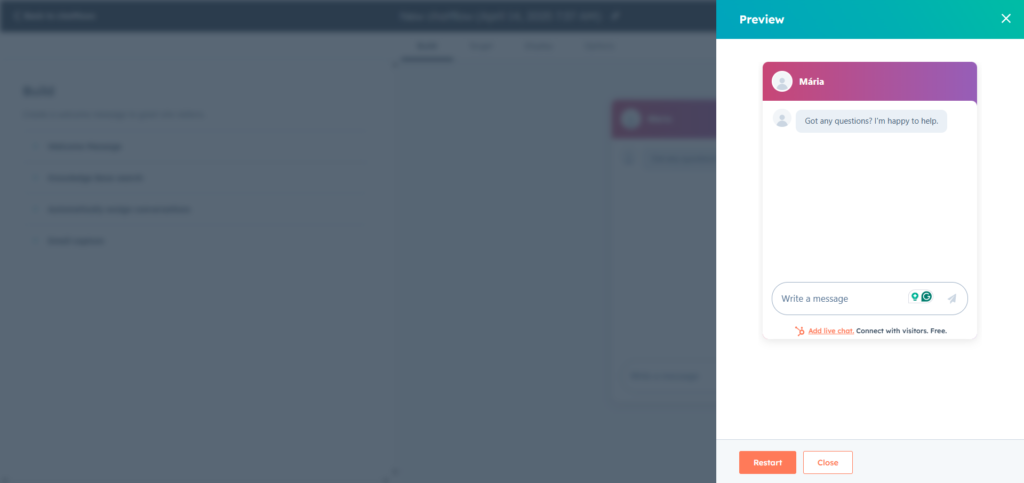
We’ll ask a simple question:
What’s FlowHunt pricing?
Since we know that FlowHunt’s pricing page is included in our FlowHUnt knowledge sources, the Chatbot should be able to give us precise information thanks to the Document Retriever:
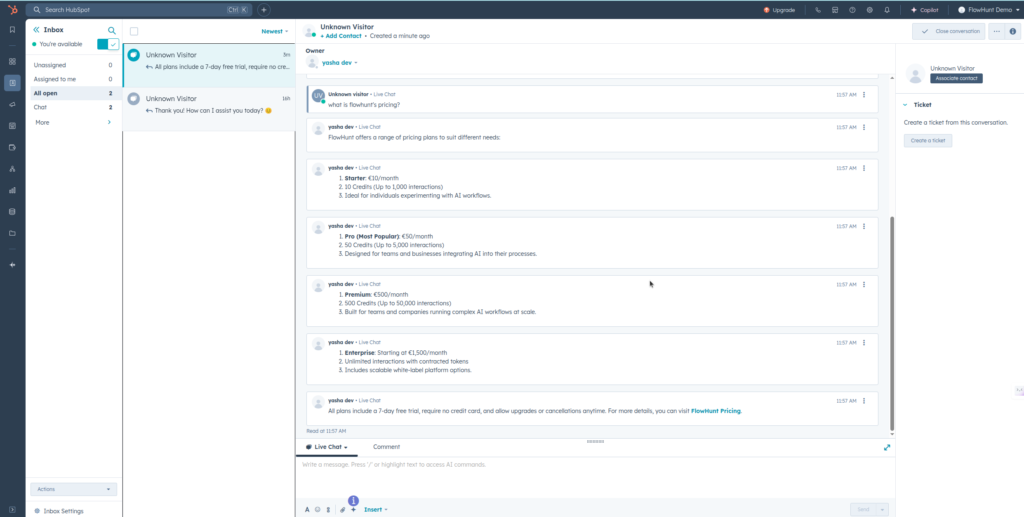
The chatbot promptly replied with the correct information. You’ll notice the chatbot broke the larger message into several smaller ones. This is due to HubSpot’s message size limitations.
Troubleshooting tips:
If you have trouble seeing FlowHunt’s response, the most likely culprit is who the thread is assigned to. Locate the thread in your inbox and check the Owner at the top.
If there is no owner assigned, you have two options:
- Free accounts – you will need to assign the thread manually
- Paid accounts – re-check the channel-specific routing options and make sure it’s routed to the correct user.
Another possible reason is incorrectly set up the thread owner in the Flow. Re-check if the correct owner is picked in the HubSpot New Message Received component.
